class 05
IMAGES
adding images
To add an image into the page you need to use an <img> element. This is an empty element (which means there is no closing tag). It must carry the following two attributes:
- src:
This tells the browser where it can find the image file. This will usually be a relative URL pointing to an image on your own site. - alt:
This provides a text description of the image which describes the image if you cannot see it.
there are more attributes in the img element such as: title, width, height, …
<img src "url" alt "text" />
three rules for Creating Images
- save Images In the right format
Websites mainly use images in jpeg, gif, or png format. If you choose the wrong image format then your image might not look as sharp as it should and can make the web page slower to load. -
save Images at the right size
You should save the image at the same width and height it will appear on the website. If the image is smaller than the width or height that you have specified, the image can be distorted and stretched. If the image is larger than the width and height if you have specified, the image will take longer to display on the page. - use the correct resolution
Computer screens are made up of dots known as pixels. Images used on the web are also made up of tiny dots. Resolution refers to the number of dots per inch, and most computer screens only show web pages at 72 pixels per inch. So saving images at a higher resolution results in images that are larger than necessary and take longer to download.
- Image dimensions: The images you use on your website should be saved at the same width and height that you want them to appear on the page.
- CroppIng Images: When cropping images it is important not to lose valuable information. It is best to source images that are the correct shape if possible.
- Image resolution: Images created for the web should be saved at a resolution of 72 ppi. The higher the resolution of the image, the larger the size of the file.
- Vector Images: Vector images differ from bitmap images and are resolution-independent. Vector images are commonly created in programs such as Adobe Illustrator.
- animated gifs: Animated GIFs show several frames of an image in sequence and therefore can be used to create simple animations.
- transparency: Creating an image that is partially transparent (or “see-through”) for the web involves selecting one of two formats: PNG, transparent GIF.
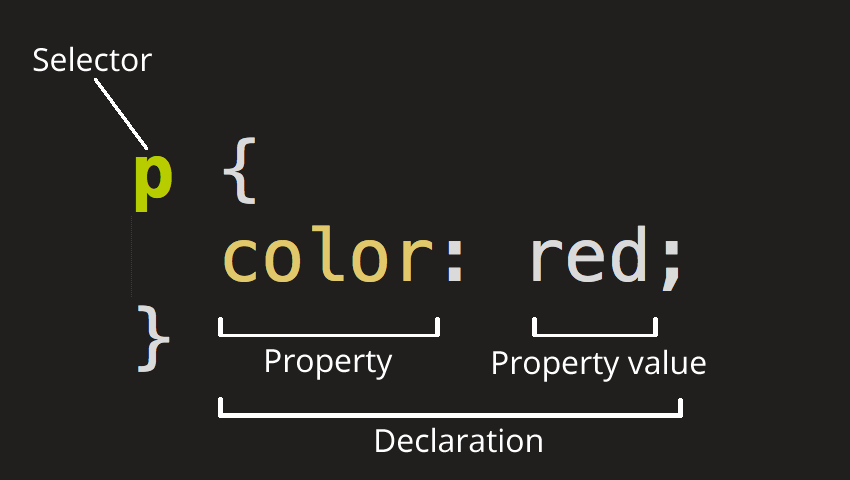
COLOR
colors can bring life to your webpage
you can change lots of things with the color property like: text color, background-color,…
- Foreground Color
colorThe color property allows you to specify the color of text inside an element.
 background color
background-colorCSS treats each HTML element as if it appears in a box, and the background-color property sets the color of the background for that box.
p{
    background-color: blue;
}
you can specify colors in multiple ways:
- RGB, RGBA:
where R is red, G is green, B is blue, A is for alpha(opacity)
ex : rgb(102,205,170)
rgb(102,205,170,0.5) - HSL, HSLA:
where H is hue, S is saturation, L is lightness, A is for alpha(opacity) ex : hsl(0,0%,78%)
hsl(0,0%,78%,0) - HEX:
hexadecimal ex :#66cdaa - color name:
ex : red
TEXT
The properties that allow you to control the appearance of text can be split into two groups:
- Those that directly affect the font and its appearance
-
Those that would have the same effect on text no matter what font you were using
you can choose the typeface for your website, When choosing a typeface, it is important to understand that a browser will usually only display it if it’s installed on that user’s computer.
Serif, Sans-serif, monospace, cursive, fantasy. - Specifying Typefaces
Thefont-familyproperty allows you to specify the typeface that should be used for any text inside the element - Size of type
Thefont-sizeproperty enables you to specify a size for the font. There are several ways to specify the size of a font. The most common are: pixels, percentages, ems
more font choice, @font-face allows you to use
a font, even if it is not installed on the computer of the person browsing, by allowing you to specify a path to a copy of the font, which will be downloaded if it is not on the user’s machine.
ex:
@font-face {
  font-family: 'ChunkFiveRegular';
  src: url('fonts/chunkfive.eot');}
  h1, h2 {
  font-family: ChunkFiveRegular, Georgia, serif;}
you can change the font, make it bold, italic, uppercase, lowercase, underline, change letter and word spacing, text alignment and much more.
- There are properties to control the choice of font, size, weight, style, and spacing.
- There is a limited choice of fonts that you can assume most people will have installed.
- If you want to use a wider range of typefaces there are several options, but you need to have the right license to use them.
- You can control the space between lines of text, individual letters, and words. Text can also be aligned to the left, right, center, or justified. It can also be indented.
- You can use pseudo-classes to change the style of an element when a user hovers over or clicks on text, or when they have visited a link.
JPEG vs PNG vs GIF
These 3 image formats have significant differences amongst themselves thus making each of them suitable for specific use cases.
- TL;DR: “too long; didn’t read”
Use JPEG format for all images that contain a natural scene or photograph where variation in colour and intensity is smooth. Use PNG format for any image that needs transparency or for images with text & objects with sharp contrast edges like logos. Use GIF format for images that contain animations. - Compression
Compression can be of two types:- lossless: it is possible to reconstruct the original image from the compressed image because there is no information loss during compression.
- lossy: data loss in lossy compression is irreversible.
JPEG is a lossy compression specification that takes advantage of human perception. It can achieve compression ratios of 1:10 without any perceivable difference in quality. Beyond this, the compression artefacts become more prominent. Because JPEG compression works by averaging out colours of nearby pixels, JPEG images are best suited for photographs and paintings of natural scenes where the variations in colour and intensity are smooth. However, if an image contains text or lines, where a sharp contrast between adjacent pixels is desired to highlight the proper shape, this lossy compression technique does not yield good results.
PNG is a lossless image format using DEFLATE compression. No data is lost during compression and no compression artefacts are introduced in the image. For this reason, a PNG image would retain higher quality than an image than JPEG and would look a lot sharper, it would also occupy more space on the disk. This makes it unsuitable for storing or transferring high-resolution digital photographs but a great choice for images with text, logos and shapes with sharp edges.
GIF is also a lossless image format that uses LZW compression algorithm. It was favoured over PNG for simple graphics in websites in its early days because the support of PNG was still growing. Given that PNG is now supported across all major devices and that PNG compression is about 5–25% better than GIF compression, GIF images are now mainly used only if the image contains animations.
- Transparency
Transparency indicates something that is completely invisible.
JPEG images don’t support transparency and are hence not usable for such cases.
PNG images support transparency in two ways — inserting an alpha channel that allows partial transparency or by declaring a single colour as transparent (index transparency). Partial transparency makes the edges blend smoothly into the background. PNG8 images (discussed in the “Colours” section below) can support only index transparency whereas PNG24 images can support alpha channel transparency.
GIF images support transparency by declaring a single colour in the colour palette as transparent (index transparency). Because of absence of partial transparency, the edges (specially rounded or too-detailed edges) get a poor jagged effect. Though this can be solved to some extent using dithering, with improved PNG support, GIF is unsuitable for images with transparent backgrounds.
- Colours
JPEG images can support around 16 million colours. This is what makes them suitable for storing images of natural scenes.
PNG images mainly have two modes — PNG8 and PNG24. PNG8 can support upto 256 colours whereas PNG24 can handle upto 16 million colours like a JPEG image. Use PNG8 for simple shapes with fewer colours and PNG24 for high quality, complex logos and shapes with rounded corners on a transparent background.
GIF images are limited to 256 colours. If index transparency is used, then one of these 256 colours is assigned as transparent and the remaining 255 are used for other colours.
- Animation
Animation, in this case, refers to any change or movement in the image. It doesn’t necessarily have to have frame rates like an animated video, but essentially a part or the entire image changes with time.
Of these 3 formats, only GIF supports animation.
